Table of Contents
EV home charging installation
EV home charging installation is one of the smartest investments electric vehicle owners can make in India today. Not only does proper home charging installation transform how you power your vehicle, but it also delivers significant savings compared to traditional fuel costs. This comprehensive guide walks you through everything you need to know about EV home charging installation from understanding your electrical system…
Before installing a home charger, make sure you understand which EV is right for you and total ownership costs to ensure you’re making the best decision for your needs and budget.
Why Home EV Charging Matters
Charger Selection Section
Think about your daily routine. You wake up, grab breakfast, and head to work. Most electric vehicle owners charge their cars exactly like this happens at night while they sleep. This simple habit changes everything about EV ownership. Home charging delivers charging convenience that gas stations simply cannot match. You’ll never have to worry about finding a charger during rush hour or planning around public station availability.
The statistics tell an interesting story. Research shows that approximately eighty percent of EV charging happens at home. This isn’t a coincidence. Home charging setup offers the lowest electricity rates, maximum convenience, and the best conditions for battery longevity. Meanwhile, public charging costs significantly more per kilowatt-hour and takes longer unless you’re using expensive DC fast charging.
Consider the economics. Your monthly fuel savings alone justify the installation investment within five to seven years. After that, you’re essentially charging for free compared to what you’d spend on gasoline. Over the lifetime of your vehicle, home charging can save you ₹50,000 to ₹100,000 or more, depending on your driving habits and local electricity rates. The Government of India’s FAME II scheme further reduces costs through subsidies and incentives for EV adoption.
This guide reveals everything you need to understand about home charger installation, from assessing your electrical system to maintaining your equipment for years of reliable service.
Understanding EV Charging Fundamentals
Before diving into installation specifics, you need to understand the basics of how home charging systems work. Electric vehicles charge differently than the phones in your pocket. Your car’s battery stores tremendous amounts of energy, requiring specific hardware and electrical considerations.
What is Home EV Charging?
Home EV charging means installing dedicated electrical equipment at your residence that transfers electricity from your home’s power supply directly into your vehicle’s battery. This sounds straightforward, but the process involves several important components working together. Your home’s electrical panel provides power through a circuit dedicated to the charger. The charger itself converts the electricity into a format your vehicle can accept. Finally, a cable connects the charger to your vehicle, enabling the actual charging process.
The beauty of this system is its simplicity once installed. Unlike filling a gas tank, you simply park your car, plug in, and let overnight charging happen automatically while you sleep. You wake up to a fully charged vehicle, ready for the day ahead.
AC vs DC Charging Explained
Electric vehicle charging uses two fundamentally different approaches: alternating current (AC) and direct current (DC). Understanding this distinction helps you grasp why home charging works the way iLevel 2 vs Level 1 Charging Speedt does.
AC charging delivers electricity exactly as it comes from your wall outlets and electrical panel. Your vehicle contains a built-in charger that converts this AC power to DC power that the battery can store. This conversion process takes time, but it’s gentle on your battery, making it ideal for overnight charging. Most electric vehicles in India follow the Bharat EV charging standards established by the Bureau of Indian Standards to ensure compatibility.
DC charging, by contrast, skips the conversion step. High-powered external equipment converts AC to DC before sending it to your vehicle. This approach charges significantly faster but generates heat and stress on the battery, which is why it’s typically reserved for road trips rather than daily use.
Home charging systems always use AC power because your residential electrical service delivers AC. This is actually beneficial for daily charging since the slower speeds protect your battery’s long-term health.
Three Levels of EV Charging
The charging industry uses three standardized levels, each with specific characteristics suited to different situations.
Level 1 Charging uses standard 120-volt household outlets—the same outlets powering your lamps and refrigerator. If you already own an electric vehicle, you likely have a Level 1 cable in the trunk. This charging method adds approximately three to five miles of range per hour. A typical overnight session might recover twenty to thirty miles. For a vehicle with a three-hundred-mile range, Level 1 charging means you’ll need multiple nights for a full charge. Level 1 works best for emergency situations or vehicles with small batteries, not as a primary daily charging solution.
Level 2 Charging at 240 volts represents the sweet spot for home EV charger installation. This is what most homeowners choose. A Level 2 system charges at approximately twenty-five to thirty miles per hour, meaning a full charge typically takes eight to twelve hours. This perfectly aligns with overnight charging. A vehicle driven forty miles daily gets completely recharged overnight at Level 2, meaning you start each day with a full battery.
Level 3 DC Fast Charging operates at 400 volts or higher and charges eighty percent in twenty to forty minutes. However, DC fast chargers cost tens of thousands of dollars and require commercial-grade power far beyond what residential services provide. These systems exist at public charging stations for road trips, not home installations.
For your home charging setup, Level 2 is almost universally the right choice. It’s affordable, fits residential electrical service, and perfectly handles daily charging needs.
Assess Your Home’s Electrical System
Before purchasing equipment or contacting electricians, you need to honestly evaluate whether your home can support home EV charger installation. This assessment prevents expensive surprises later and helps you make informed decisions about your investment.
Evaluate Your Electrical Panel Capacity
Your home’s electrical panel is the distribution center for all electricity entering your house. Think of it like a water main controlling flow to different pipes throughout the building. The panel rates the maximum electrical service it can safely deliver—typically 100 amps or 200 amps for residential homes.
Here’s the critical question: how much capacity remains available? If your panel is constantly running near maximum, adding a large EV charger creates problems. An 11-kilowatt Level 2 charger requires approximately forty-eight amps at full power. In a 100-amp service home that’s heavily used, this might exceed capacity. In a 200-amp service, it’s rarely an issue.
To assess your situation honestly, look at your electrical panel door. You’ll find the service rating stamped on the main breaker. Ask yourself: what percentage of this service is typically in use? Do air conditioning, heating, water heaters, and other large appliances run simultaneously with expected EV charging times? If you’re regularly at eighty percent capacity during evening hours when you’d charge, a panel upgrade becomes necessary.
Many homes built in the nineteen-seventies and eighties have 100-amp service. These older installations often need upgrades to support modern appliances plus EV charging. Homes built in the last twenty years usually have 200-amp service with plenty of available capacity.
Choose the Right Installation Location
Your charger’s location matters for both practical and economic reasons. The closer your charger sits to your electrical panel, the shorter the cable run and the lower the installation cost. A charger mounted on the wall two feet from the panel costs significantly less to install than one requiring fifty feet of conduit and cable running through walls and across your property.
Charger location also depends on where you actually park. Installing a charger in your garage doesn’t help if you park on the street. Consider your typical parking location first, then work backward to the electrical panel. In most cases, garages offer the best locations—they provide weather protection and usually sit closer to where panels are typically mounted.
Weather protection matters more than you might think. Level 2 chargers installed outdoors need weatherproof ratings and sealed connections. Garage installation eliminates these concerns and reduces maintenance. If your vehicle parks outside, choose a location with roof coverage or select premium weatherproof equipment.
Check Local Electrical Codes and Regulations
Electrical codes exist for safety, not bureaucracy. They prevent fires, electrocution, and other hazards. Different regions have different requirements, but all legitimate installations follow the National Electrical Code (NEC) standards and local regulations.
Some areas require licensed electricians to perform all electrical work. Others permit some work with proper permits. Some jurisdictions have specific EV charger certifications or requirements. Your electrician should handle this complexity, but understanding that codes vary helps you respect the process rather than resent it.
Permits take time but serve real purposes. Inspectors verify that wiring is properly sized, grounding is correct, breakers match circuit requirements, and connections are secure. These aren’t obstacles they’re protections for your safety and your home’s electrical integrity.
Complete Cost Breakdown: What Will You Spend?
Understanding the full financial picture helps you make informed decisions about your home charging investment. Many people focus only on charger cost and ignore installation expenses, then feel shocked when the total arrives.
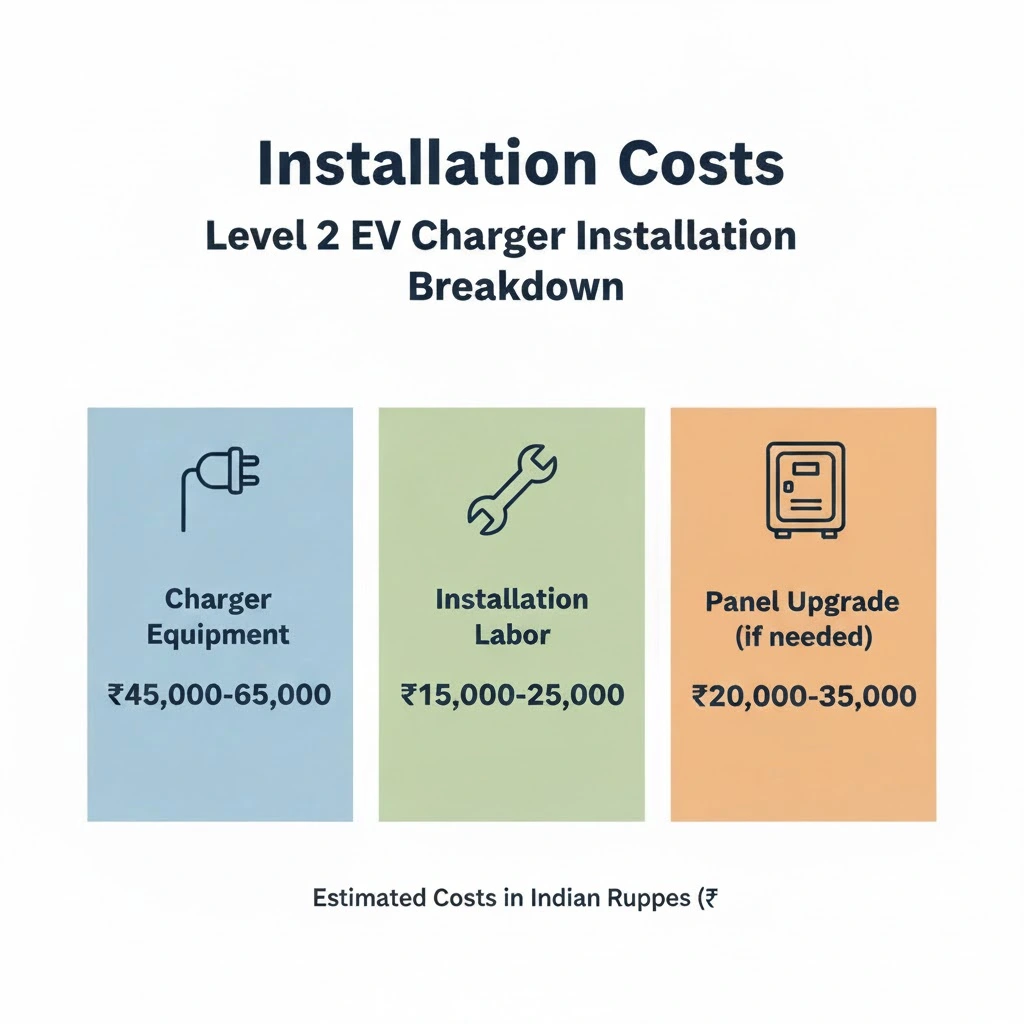
Equipment Costs
The charging equipment itself ranges from ₹45,000 to ₹95,000 depending on brand, features, and power output. Budget chargers offer basic functionality—they charge your vehicle, nothing fancy. Premium options include built-in wifi, smartphone apps, advanced load management, and aesthetic designs that blend into your home.
Tesla Wall Connector units cost approximately ₹85,000 and work exclusively with Tesla vehicles unless you purchase an adapter. Multi-brand options from Charge+ Station (₹65,000) or Fortum Charge (₹95,000) accept any vehicle with standard charging connections. Local brands offer budget alternatives from ₹45,000 to ₹60,000 with shorter warranties but lower upfront costs.
Choose based on your budget and vehicle type. If you own a Tesla and don’t plan to buy other brands, the Tesla-specific charger makes sense. Multi-brand chargers give flexibility for future vehicles or household changes.
Installation Labor Costs
Installation complexity determines labor costs more than distance. A straightforward setup in a garage with the panel nearby might cost ₹8,000 to ₹15,000 in labor. Standard installations running fifty feet of cable through walls typically cost ₹20,000 to ₹35,000. Complex situations—routing through outdoor walls, multiple turns, difficult access—run ₹40,000 to ₹60,000. Panel upgrades add another ₹60,000 to ₹100,000.
Electricians charge based on time and complexity, not distance. A fifty-foot run through basement is easier than a twenty-foot run requiring holes through multiple walls. Get quotes from multiple electricians. Their estimates should include all labor, materials, and permit costs.
Electrical Panel Upgrade Costs
If your panel needs an upgrade from 100 amps to 200 amps, you’ll spend ₹50,000 to ₹150,000 depending on your home’s age and construction. Older homes with buried service lines or distance from the street’s main service typically cost more. Modern homes with accessible service usually cost less.
A panel upgrade isn’t optional if your assessment reveals insufficient capacity. It’s necessary for safety. Overloading an undersized panel creates fire risks and damage potential far exceeding the upgrade cost.
Permits and Inspections
Building permits run ₹2,000 to ₹5,000. Electrical inspections cost ₹1,000 to ₹3,000. Connection approvals from your utility might add ₹1,000 to ₹2,000. These are regulatory costs you cannot avoid if you want a legal, permitted installation.
Total Installation Cost Scenarios
Let’s look at realistic scenarios so you understand what different situations actually cost.
A best-case scenario assumes straightforward conditions. You have a 200-amp panel with forty percent available capacity, garage location close to the panel, no obstacles, and straightforward installation. Total cost: ₹78,000 (₹65,000 charger plus ₹10,000 labor plus ₹3,000 permits).
A typical scenario reflects most homeowners’ situations. You have adequate panel capacity but need some electrical work, standard fifty-foot cable run, and normal complexity. Total cost: ₹109,000 (₹80,000 charger plus ₹25,000 labor plus ₹4,000 permits).
A complex scenario involves a panel upgrade, difficult installation location, and compliance costs. Total: ₹219,000 (₹95,000 charger plus ₹45,000 labor plus ₹75,000 panel upgrade plus ₹4,000 permits).
Most installations fall into the typical category. Expect ₹100,000 to ₹130,000 as your working budget. The payback period ranges from five to seven years through fuel savings, after which charging costs approach zero compared to gasoline.
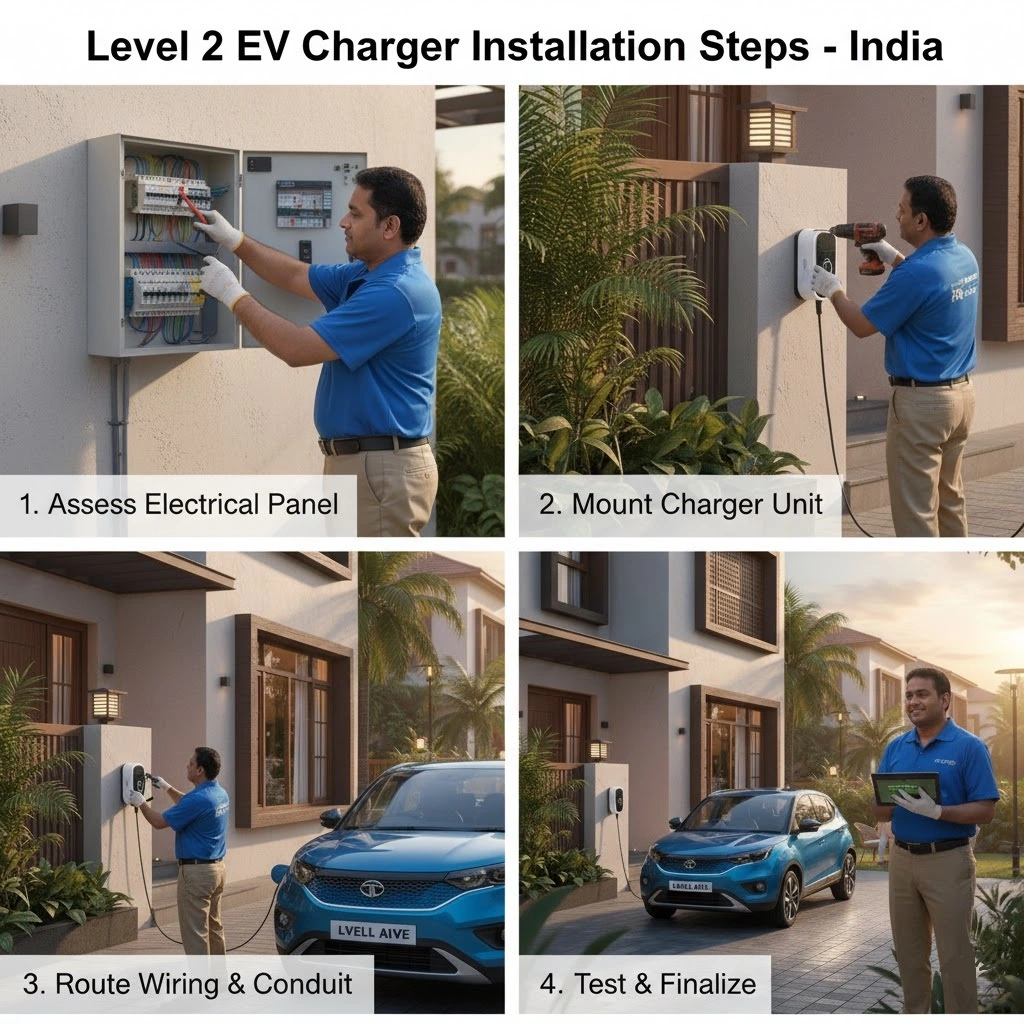
Step-by-Step Installation Process
Understanding the actual installation process removes anxiety and helps you know what to expect. Professional installation typically follows this sequence.
Step 1: Understand Your Charging Needs
Before calling electricians, honestly assess how much home EV charging power you actually require. This depends on your daily driving pattern and charging frequency.
If you drive under thirty miles daily and can charge every night, a 7.4-kilowatt charger works perfectly. You’ll get full overnight charges with minimal equipment cost. If you drive fifty miles daily, you still get full charges at 7.4 kilowatts but take slightly longer. If you frequently charge to eighty percent mid-day because of evening driving, an 11-kilowatt charger adds flexibility.
Different EVs have different charging capabilities and battery sizes. See our complete EV comparison guide to understand your specific vehicle’s charging needs and optimal power requirements. “`
Most households benefit from 7.4-kilowatt chargers. The cost difference between 7.4 and 11 kilowatts is relatively small, but unless you need that extra power, it’s wasteful spending. Tailor your choice to actual usage.
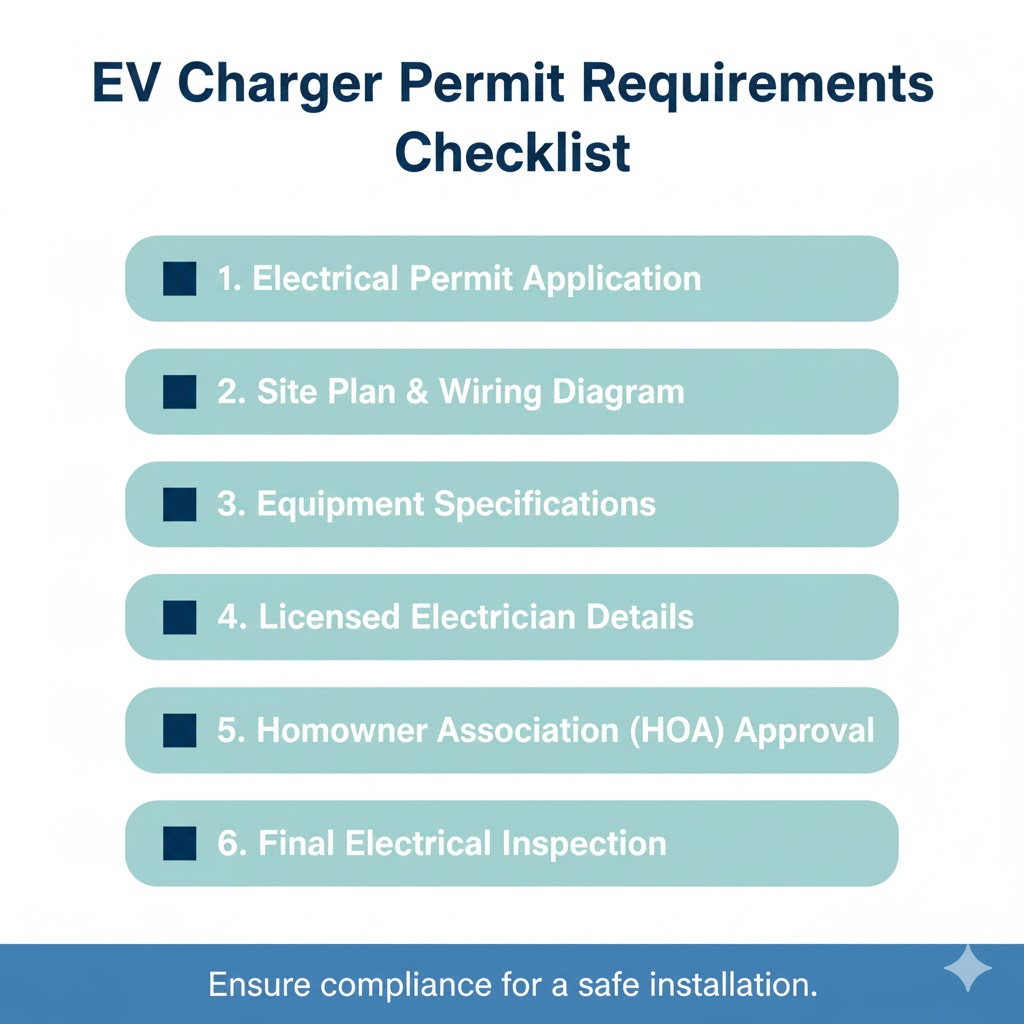
Step 2: Obtain Necessary Permits
Contact your local building department first. Explain that you’re installing a Level 2 EV charger. They’ll direct you to specific requirements and forms. Your electrician typically handles this process, but understanding the steps helps you follow along.
The department will explain what documentation they needvusually electrical plans showing the charger location, circuit specifications, and grounding details. Your electrician creates these plans. You submit them with permit application and fees. The department reviews compliance with electrical code. Approval typically takes one to two weeks. Once approved, you can schedule installation.
Step 3: Hire a Licensed Electrician
Choose a licensed, insured electrician with EV charging experience. Ask potential electricians how many chargers they’ve installed. Someone who’s installed dozens brings expertise; someone installing their first charger might miss important details.
Request references from recent installations. Call those homeowners and ask aboutTroubleshooting their experience. Did the work proceed smoothly? Did it finish on schedule? Was the electrician professional? These conversations reveal whether you’re working with someone competent and reliable.
Ask specific questions: Are you familiar with our state’s electrical codes? Do you handle permits? What warranty do you provide on your work? A good electrician answers confidently and provides references.
Step 4: Site Assessment and Preparation
Your electrician visits your home to assess the situation. They examine your electrical panel, evaluate capacity, identify the optimal installation location, and plan the cable route. They check for obstacles like water pipes, framing, or other utilities that might complicate wiring. They verify that your plan complies with local codes. They provide an accurate, detailed cost estimate.
This assessment is crucial. It’s when potential problems surface. If your panel needs upgrading, your electrician identifies it now. If cable routing requires special conduit or methods, they factor this in. This is also when you ask questions and understand exactly what will happen during installation.
Step 5: Schedule Installation
Installation itself typically takes four to twelve hours depending on complexity. Simple garage installations might finish in one day. Complex situations with panel upgrades might require multiple visits spread across several days. Your electrician coordinates timing around permit approval and inspection scheduling.
During installation, the electrician shuts off power to the work area (if required), routes electrical cable through walls or conduit, installs a new breaker in your electrical panel, mounts the charging equipment on your wall, makes all electrical connections securely, tests the entire system thoroughly, and restores power. Finally, they schedule any required inspection.
Step 6: Inspection and Approval
A building inspector visits to verify that everything meets code. They check that permits were obtained, work meets electrical standards, breaker sizing is correct, all connections are secure, grounding is proper, and no safety violations exist. Inspection typically happens within one to two weeks of requesting it.
If everything checks out, you receive approval. If issues arise, the inspector explains what needs correction. Most inspections pass without problems when licensed electricians do the work properly.
Step 7: Configure and Test
Once installation completes and inspection passes, you configure your charger for operation. If your charger has wifi connectivity, you’ll connect it to your home network. You download the charger’s companion app if one exists. You create an account and set charging preferences. You configure amperage limits if your charger offers this feature. Finally, you connect your vehicle and test the entire system to verify operation.
Charging Speed and Efficiency
Realistic expectations about charging time help you plan your driving routine and verify that Level 2 charging meets your needs.
The difference between Level 1 and Level 2 charging is dramatic. Here’s how long it takes to fully charge popular EVs in India:
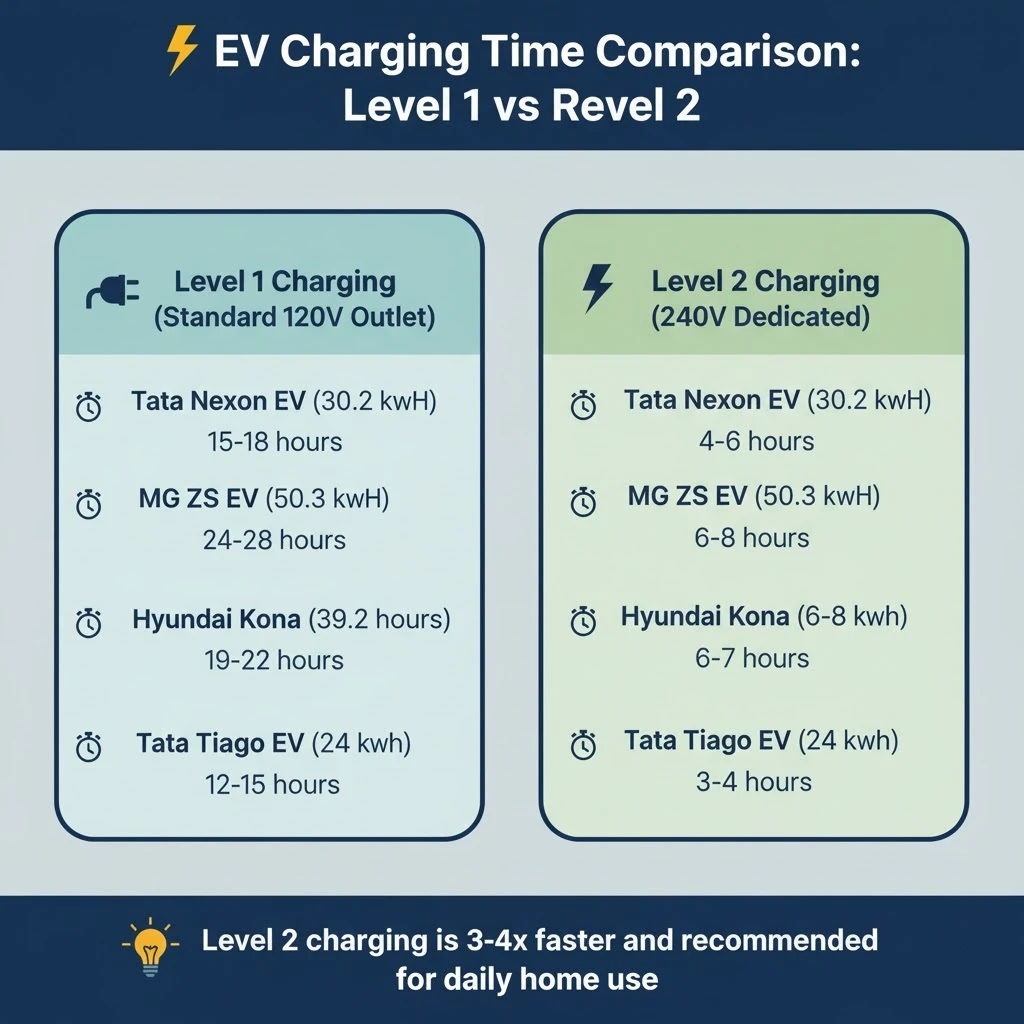
As you can see, Level 2 charging reduces charging time by 70-75%, making it practical for daily use. Most Indian EV owners choose Level 2 for home installation.
How Long Does Home Charging Actually Take?
The time required depends on your vehicle’s battery size, your charger’s power output, and your starting battery state. A Tesla Model 3 with a fifty-four kilowatt-hour battery charges in approximately eight hours at 7.4 kilowatts. The same vehicle at 11 kilowatts finishes in roughly six hours. Larger vehicles take longer. A Kia EV6 with a seventy-seven kilowatt-hour battery charges in approximately eleven hours at 7.4 kilowatts.
Most owners charge overnight and wake to full batteries. If you drive fewer than fifty miles daily, overnight charging completely recovers your range. Even if you drive eighty miles daily, you’ll recover most of your range overnight and top off with public charging on rare long-drive days.
What Affects Charging Speed?
Several factors influence how quickly your battery accepts charge. Your charger’s power output obviously matters 7.4 kilowatts charges faster than 5.5 kilowatts. Your vehicle’s maximum charging rate matters too. Some vehicles accept higher power than others. Battery temperature significantly affects speed. Cold batteries charge slower. A battery below freezing might charge thirty to forty percent slower than at room temperature. Battery state of charge matters as well. When your battery is mostly empty, it accepts charge quickly. As you approach eighty percent, charging automatically slows to protect battery health. This is actually beneficial. Slowing down near full charge dramatically extends battery lifespan.
Ambient temperature affects everything. Hot weather doesn’t slow AC charging but does slow DC fast charging. Cold weather slows both. Simultaneous charging of multiple vehicles on the same circuit slows all of them.
Optimal Charging Practices
To maximize battery lifespan and efficiency, follow these practices. Charge to eighty percent during regular daily use rather than one hundred percent. The last twenty percent requires much longer charging and stresses the battery. One hundred percent is best reserved for road trips. Charge during off-peak hours when electricity rates are lowest. Most utilities offer cheaper rates between 9 PM and 6 AM. Avoid fast charging regularly. Reserve DC fast charging for road trips. Daily use of fast charging ages your battery prematurely. Keep your battery moderately cool when possible. Garage parking helps. Covered outdoor locations work better than full sun exposure.
These practices might seem like minor adjustments, but they genuinely extend your battery to retain ninety percent or more of its capacity after ten years.
Electricity Costs: What Will You Actually Pay?
Accurate cost expectations help you understand the financial benefits of home EV charging and plan your budget accordingly.
How Much Does Home Charging Cost?
The actual cost depends on three variables: your vehicle’s efficiency, your electricity rate, and how much you drive. Let’s calculate a realistic example.
Assume your vehicle achieves six kilometers per kilowatt-hour—a typical efficiency. Your electricity rate is ₹8 per kilowatt-hour, which represents India’s average residential rate. You drive forty kilometers daily. This means you consume approximately 6.7 kilowatt-hours of charging daily. At ₹8 per kilowatt-hour, that’s ₹53 daily, approximately ₹1,600 monthly, or ₹19,200 annually. Compare total charging costs using our EV Cost Calculator to see your exact savings over the lifetime of vehicle ownership.
Compare this to gasoline costs. A petrol vehicle averaging fifteen kilometers per liter costs approximately ₹300 to ₹400 daily in fuel. Your electric vehicle costs ₹50 to ₹60 daily in electricity. The monthly savings reach ₹7,000 to ₹10,000. Annually, you save ₹84,000 to ₹120,000 just in fuel costs, not counting maintenance savings.
Time-of-Use Electricity Rates
Most Indian utilities offer time-of-use rates where electricity costs less during off-peak hours. Peak hours from 9 AM to 9 PM typically cost ₹10 to ₹12 per kilowatt-hour. Off-peak hours from 9 PM to 6 AM cost ₹6 to ₹8 per kilowatt-hour. Check with your local electricity distribution company or the Central Electricity Authority for specific tariff structures in your area.
If you charge during peak hours, your anual cost might reach ₹23,000. If you strategically charge during off-peak hours, your annual cost drops to ₹14,400. That’s ₹8,400 annual savings simply by timing your charging strategically. Overnight charging makes this effortless. You plug in before bed and wake to savings.
Real Homeowner Case Studies
Learning from others’ experiences provides practical insights and realistic expectations.
Case Study 1: Urban Apartment Owner (Delhi)
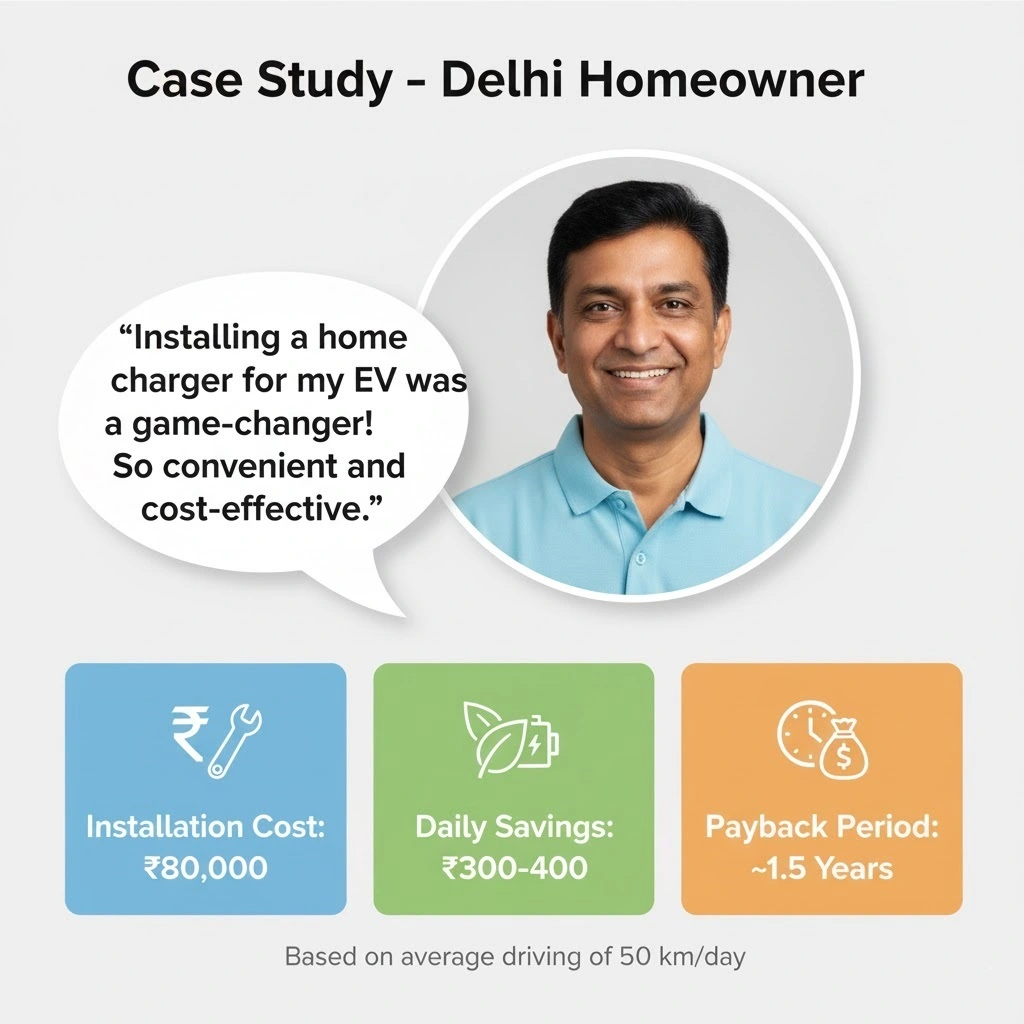
Rajesh lives in a Delhi apartment with assigned parking in a shared garage. He drives a Tesla Model 3 approximately thirty-five kilometers daily for his office commute. Installing a home charger presented challenges because he needed approval from his Resident Welfare Association and dealt with a shared electrical panel.
His approach involved getting a No Objection Certificate from his RWA, which took four weeks of paperwork and meetings. He then negotiated with building management about panel capacity and installation location. They approved a 7.4-kilowatt charger since 11 kilowatts exceeded available panel capacity. His total cost reached ₹95,000 including charger, installation, and society approval fees. The entire process took six weeks.
Today, Rajesh charges overnight and starts each morning with a full battery. His daily charging cost is approximately ₹55. He’s eliminated daily trips to petrol pumps and charges at his building’s energy-efficient off-peak rates. He projects breaking even on his investment within six years, then enjoying pure savings afterward.
His key learning: apartment living requires more planning, but home charging remains completely feasible with proper approvals and realistic expectations.
Like Rajesh’s experience? Read more real owner testimonials from EV owners across India to learn from their journeys and avoid common mistakes.
Case Study 2: Suburban Villa Owner (Bangalore)
Priya owns a villa in suburban Bangalore and drives a Kia EV6 approximately sixty kilometers daily. Her home predates modern electrical standards with only 100-amp service. Her electrician’s assessment revealed that panel upgrading was necessary.
She invested ₹80,000 upgrading from 100 to 200-amp service. She then installed an 11-kilowatt Level 2 charger for ₹105,000. Total investment: ₹185,000. Installation completed in two weeks following permits.
Her vehicle charges fully in eight hours, meaning overnight charging completely covers her sixty-kilometer daily driving plus additional range. Her daily charging cost reaches ₹65. She’s saving ₹2,000 monthly compared to petrol driving. Her payback period is five years, and she’s thrilled with the investment.
Her key learning: panel upgrades cost significant money, but the long-term savings and convenience justify the investment completely.
Case Study 3: Tech Worker Home Office (Pune)
Ameya works from home most days in his Pune house. He drives his Hyundai Ioniq 5 approximately twenty-five kilometers daily, mostly local driving. His garage sits fifty feet from his electrical panel.
He installed a 7.4-kilowatt charger rather than 11 kilowatts because his low daily mileage didn’t warrant the extra cost. His total investment was ₹98,000. His charger fully charges his vehicle in twelve hours, perfect for his usage pattern.
He charges twice weekly rather than nightly since his short daily driving means he doesn’t deplete the battery completely. His monthly electricity cost runs ₹800 to ₹900. His payback period is eight to nine years—longer than higher-mileage drivers but still economically sound.
His key learning: matching equipment to actual usage patterns prevents overspending on unnecessary capacity.
Permits and Legal Requirements
Understanding regulatory requirements removes confusion and builds respect for processes that exist for genuine safety reasons.
Do You Need Permits?
Most jurisdictions require permits for any Level 2 charging installation. Permits exist because electrical work carries safety implications. Improper installation creates fire hazards, shock risks, and damage potential far exceeding permit costs.
When permits are mandatory, attempting unpermitted installation creates several risks. Your homeowner’s insurance won’t cover fire damage from unpermitted electrical work. Unpermitted work complicates home sales or refinancing. Resale value suffers because future buyers worry about undisclosed electrical modifications. Potential liability becomes your responsibility if someone is injured.
Permits might seem bureaucratic, but they’re actually protections for you and your property.
The Permit Process
Your electrician typically handles permits, but understanding the process helps you follow along. The electrician contacts your building department, submits plans showing the installation details, and pays permit fees. The department reviews plans for code compliance. If everything looks correct, you receive a permit within one to two weeks. If questions arise, the department explains required changes. Once the permit is approved and displayed on-site, installation proceeds. After completion, the building department schedules an inspection. The inspector verifies everything meets code standards. Upon passing inspection, the permit is closed and your charger is officially approved.
This process typically takes four to six weeks from initial application to final approval, with most time spent in the review phase before actual work begins.
Why Permits Matter
Permits serve critical purposes beyond bureaucracy. They ensure electrical safety by requiring inspectors to verify proper sizing of breakers and wiring. They confirm that grounding is appropriate and connections are secure. They protect your property value by creating an official record that electrical work was done correctly. They satisfy insurance requirements and make future home sales straightforward.
Maintenance and Long-Term Care
Fortunately, home EV chargers require minimal maintenance compared to gas vehicle infrastructure or many other home systems.
Regular Maintenance Schedule
Monthly visual inspections take five minutes. Look for any visible damage, corrosion on connections, or loose parts. Quarterly cleaning of weatherproof seals keeps water out. These are completely free tasks requiring only basic attention.
Annually, have a licensed electrician perform a comprehensive check. They test connections, verify power delivery, and ensure everything operates properly. This typically costs ₹500 to ₹1,000 and takes thirty minutes. Every five years, invest in professional weatherproofing renewal (₹2,000 to ₹3,000) to maintain protection against moisture and corrosion.
This minimal maintenance means your charger typically operates reliably for ten to fifteen years with basic care.
Common Issues and Troubleshooting
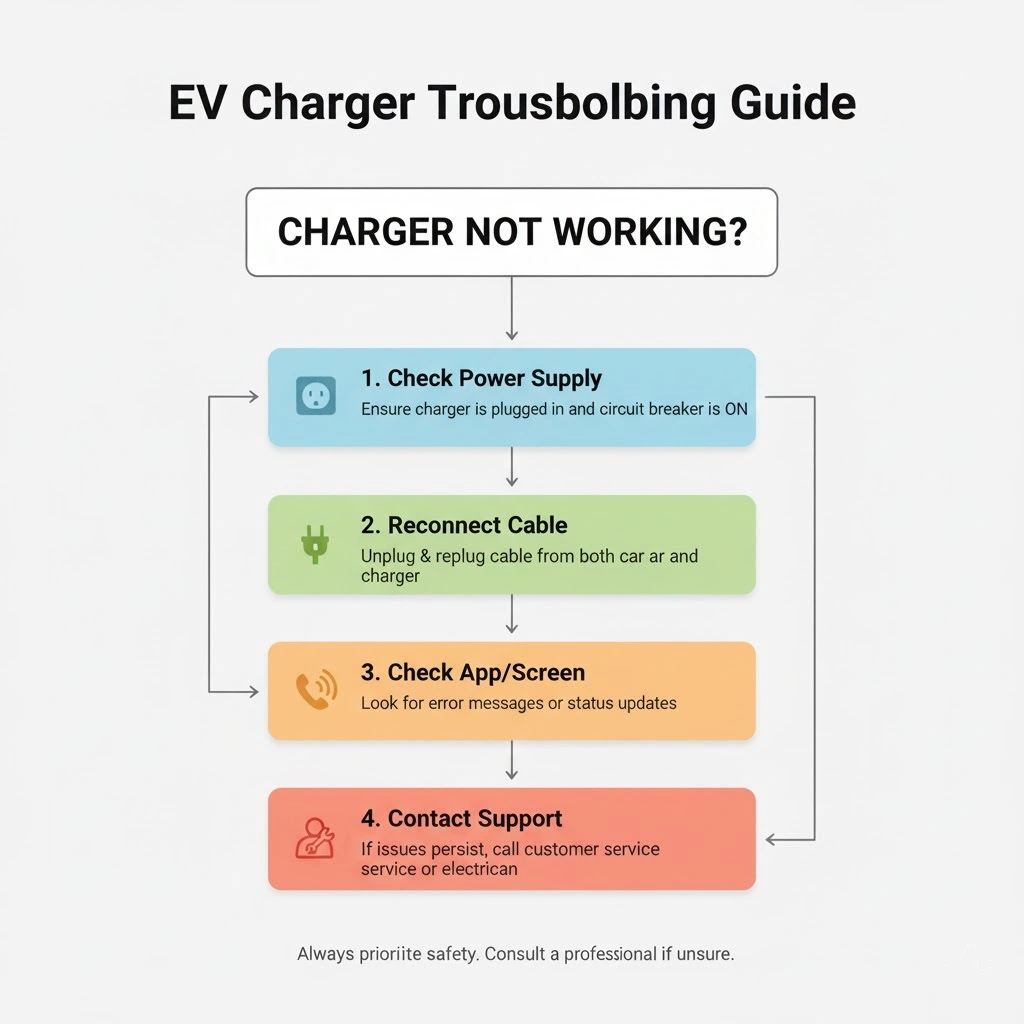
Most issues have simple solutions. If your charger won’t start, the circuit breaker might have tripped. Reset it at your electrical panel. If charging runs slowly, call your electrician to check line voltage. If your charger won’t recognize your vehicle, update the charger’s software via its app. For physical damage or any burning smells, stop using the charger immediately and contact your electrician.
These situations are rare. Most owners operate their chargers for years without encountering problems.
Charger Lifespan and Replacement
Quality chargers typically operate reliably for ten to fifteen years. Most carry three to five-year warranties on parts with longer coverage available for premium models. After the warranty period, repairs become your responsibility, but well-maintained chargers rarely require service.
Budget for eventual replacement around ten years, though many installations continue operating well beyond this timeframe. When replacement becomes necessary, you’ll have newer, more efficient models available.
Comparing Home vs Public Charging
Each charging type serves different purposes in your EV ownership experience.
When to Use Home Charging
Daily charging should happen at home. The cost is lowest thanks to off-peak rates. Convenience is maximum—no hunting for chargers or waiting in lines. Your battery stays healthier because slow overnight charging is gentler than frequent DC fast charging. Your vehicle is always ready for the next day of driving. Weather protection in garages preserves equipment and vehicle condition.
Home charging is your daily workhorse. Make it your default choice for regular use.
When to Use Public Charging
Road trips benefit from public fast charging. When you’re driving 300 miles in one day, overnight home charging doesn’t make sense. DC fast chargers make sense for extending range quickly. Workplace charging during eight-hour workdays adds range for second-car driving without special installation. Emergency situations when your home charger fails justify public charging temporarily.
Public charging is your supplement for specific situations, not your daily solution.
Frequently Asked Questions
Can I use a standard outlet to charge my EV at home?
Yes, but only as a backup option. Standard 120-volt Level 1 outlets charge at approximately three to five miles per hour. Reaching a full charge takes twenty-four to forty-eight hours. This works for emergency recovery or single-night charging but is impractical for daily use. Install Level 2 for realistic daily charging.
Is it expensive to install a home EV charger?
Most installations cost ₹80,000 to ₹150,000 total. This sounds significant until you consider the payback. Through fuel savings, you recover this investment in five to seven years. After that, you’re essentially charging for free compared to gasoline. Over your vehicle’s ten-year lifespan, home charging saves ₹200,000 to ₹500,000 compared to fuel costs.
Do I need a licensed electrician?
Yes. Most jurisdictions require licensed electricians for Level 2 installation. This protects your safety and ensures code compliance. Licensed electricians carry insurance and provide warranties. The cost is worth the protection.
What if I live in an apartment?
Get approval from your Resident Welfare Association or building management. Some buildings already have chargers. Others permit individual installation with approval. The process takes longer than single-family homes, but it’s entirely feasible with patience and proper permissions.
How long does installation take?
Simple installations complete in four to six hours. Standard situations take eight to ten hours. Complex installations span multiple days. Panel upgrades add additional time. Your electrician provides accurate estimates during assessment.
Will home charging significantly increase my electricity bill?
Charging costs ₹50 to ₹70 daily but saves ₹200 to ₹300 daily compared to gasoline. Your net savings reach ₹5,000 to ₹7,000 monthly. Yes, your electricity bill increases, but your overall transportation costs drop dramatically.
Conclusion: Making Your Decision
Installing home EV charging is one of the smartest investments you can make as an electric vehicle owner. The financial case is compelling—five to seven-year payback followed by decades of savings. The convenience is undeniable—waking each morning to a charged vehicle. The environmental impact is significant—reducing reliance on fossil fuels.
Your next steps are straightforward. Assess your home’s electrical system honestly. Get quotes from two to three licensed electricians. Understand your total cost for your specific situation. Decide between 7.4 and 11-kilowatt power levels based on your driving patterns. Work through permitting with your electrician. Schedule installation. Enjoy convenient, economical charging for years.
Home EV charging transforms how you live with your electric vehicle. Make it happen sooner rather than later.
Ready to go electric? Start with our Complete EV Buying Guide to make an informed decision about which electric vehicle is right for your needs, budget, and lifestyle in India.